 In this tutorial we’re going to change the Chat Box styling to make the Chat Box purple, and remove the round edges.
First, open a text editor, such as Notepad, as a place to store the changes you’ll be making to your website’s CSS file.
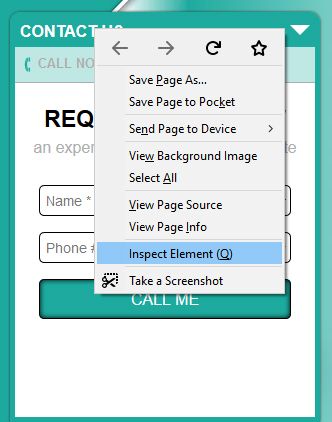
With your site open in either Firefox or Chrome, and with the Chat Box in the open state, right click on the words “Contact Us” in the Chat Box. Choose “Inspect” or “Inspect Element” from the popup menu. A pane should open up with the HTML on the left and the CSS on the right. On the HTML side (Elements or Inspector tab), a SPAN tag with the words “Contact Us” will likely be highlighted.
Above this SPAN tag will be a DIV tag with an ID of “fs-chat-box” and a CLASS of “open.” Click on this DIV tag.
On the CSS side of the pane (Styles or Rules tab), you should see a section with an ID of #fs-chat-box.open. Highlight that text, copy it into your text editor, and place an open curly brace at the end like this:
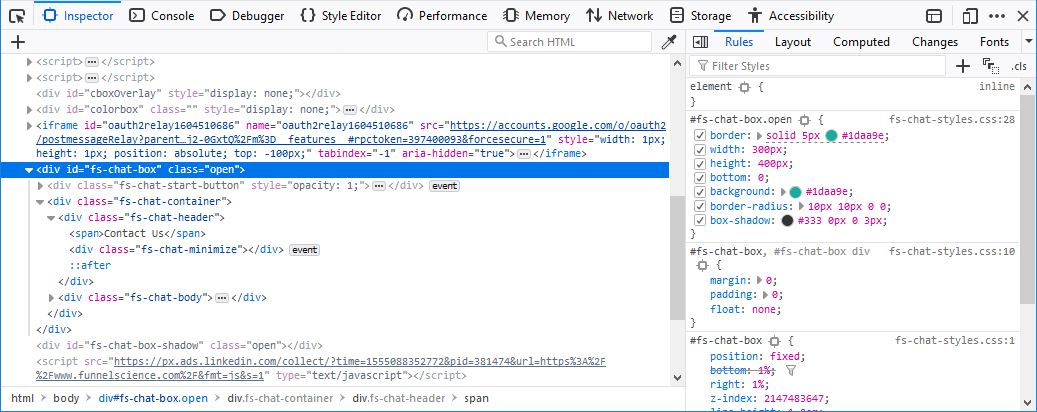
#fs-chat-box.open {The next line down on the CSS side is the border:
border: solid 5px #1daa9e;Edit this line so that it reads:
border: solid 5px #808;The border of the Chat Box should now be a purple color.
These changes are temporary, and visible only to you until the page is reloaded. You’ll need to store these changes in your open text editor to be added to your website’s main CSS file.
Copy this new line into your text editor, and add the !important modifier to the end, like so:
#fs-chat-box.open {
border: solid 5px #808 !important;
This will ensure that this line of CSS will override the defaults set in the Funnel Science CSS file when you insert this code in your CSS file.
You will be using the !important modifier on every line you change.
Next, change the background to purple and the border-radius to 0 (zero) in the CSS side of the pane:
background: #1daa9e; to background: #808;
border-radius: 10px 10px 0 0; to border-radius: 0;
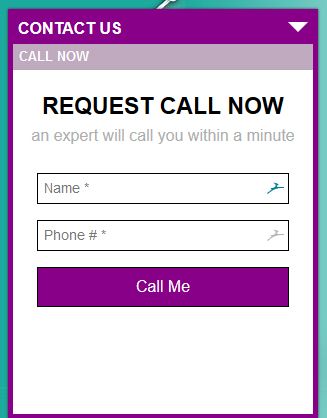
The background behind “Contact Us” should now be purple, and the whole Chat Box border should be square.
Copy these changes into your text editor and add the !important modifier. Since this is the end of the changes we’ll be making to this section, we’ll also add the closing curly brace:
#fs-chat-box.open {
    border: solid 5px #808 !important;
    background: #808 !important;
    border-radius: 0 !important;
}
Now we’ll change the “CALL NOW” heading. Right click on the “CALL NOW” heading text and click Inspect. The SPAN with the text “CALL NOW” should be highlighted in the HTML side of the pane.
Click on the DIV with a CLASS of “fs-cmh-call selected” a few lines up.
As we did before, we’ll modify the section in the CSS pane,
#fs-chat-box .fs-chat-menu-header div.selectedThe only line in it is the background, which we’ll change to a foamy purple, #bfaabf. The CSS in your text editor should be:
#fs-chat-box .fs-chat-menu-header div.selected {
    background: #bfaabf !important;
}
Of course, now we can’t read the text as the grey color is too close to our purple. A couple of sections down is the class,
#fs-chat-box .fs-chat-menu-header div…with a color of #aeaeae. Let’s change that to #fff and add it to our text editor. Just for grins, we’ll make the text a touch larger too:
#fs-chat-box .fs-chat-menu-header div {
    color: #fff !important;
    font-size: 14px !important;
}
Now that phone icon looks out of place. Let’s get rid of it.
On the HTML side, one line down is the IMG tag for the phone icon. Click on it.
On the CSS side in,
#fs-chat-box .fs-chat-menu-header div imgClick on the word: “middle” in,
vertical-align: middle;…then press enter. This will start a new line. Type,
display: none;This will hide the phone icon. In your text editor, you should add:
#fs-chat-box .fs-chat-menu-header div img {
    display: none !important;
}
Next, we want to remove the round corners from the input fields. Right click on the “Name” field, and click inspect. You should have the “Name” input field selected on the HTML side. On the CSS side, edit:
.fs-chat-menu-body form > div input, .fs-chat-menu-body form > div button, .fs-chat-menu-body form > div textarea, .fs-chat-menu-body form > div select…and change:
border-radius: 5px;to:
border-radius: 0;You’ll see the rounded corners turn square.
You’ll add:
.fs-chat-menu-body form > div input, .fs-chat-menu-body form > div button, .fs-chat-menu-body form > div textarea, .fs-chat-menu-body form > div select {
    border-radius: 0 !important;
}
…to your text editor.
Finally, it’s time to change the “CALL ME” button. Right click on it, and click inspect. On the HTML side, the BUTTON element will be selected. On the CSS side, edit:
#fs-chat-box buttonSet the background color to #808, the border-radius to 0, text-transform to capitalize, and the box-shadow to none. You should end up with:
#fs-chat-box button {
    background: #808 !important;
    border-radius: 0 !important;
    text-transform: capitalize !important;
    box-shadow: none !important;
}
…in your text editor.
Your completed code should be:
#fs-chat-box.open {
    border: solid 5px #808 !important;
    background: #808 !important;
    border-radius: 0 !important;
}
#fs-chat-box .fs-chat-menu-header div.selected {
    background: #bfaabf !important;
}
#fs-chat-box .fs-chat-menu-header div {
    color: #fff !important;
    font-size: 14px !important;
}
#fs-chat-box .fs-chat-menu-header div img {
    display: none !important;
}
.fs-chat-menu-body form > div input, .fs-chat-menu-body form > div button, .fs-chat-menu-body form > div textarea, .fs-chat-menu-body form > div select {
    border-radius: 0 !important;
}
#fs-chat-box button {
    background: #808 !important;
    border-radius: 0 !important;
    text-transform: capitalize !important;
    box-shadow: none !important;
}
And that’s it! Add the completed code in your text editor to your website’s main CSS file. The end of the file is generally the best place to add it.
Any part of the Chat Box can be edited in the same way as the elements we’ve edited in this tutorial.
For the complete CSS Reference, visit: https://www.w3schools.com/cssref/
#fs-chat-box.open {
    border: solid 5px #808 !important;
    background: #808 !important;
    border-radius: 0 !important;
}
#fs-chat-box .fs-chat-menu-header div.selected {
    background: #bfaabf !important;
}
#fs-chat-box .fs-chat-menu-header div {
    color: #fff !important;
    font-size: 14px !important;
}
#fs-chat-box .fs-chat-menu-header div img {
    display: none !important;
}
.fs-chat-menu-body form > div input, .fs-chat-menu-body form > div button, .fs-chat-menu-body form > div textarea, .fs-chat-menu-body form > div select {
    border-radius: 0 !important;
}
#fs-chat-box button {
    background: #808 !important;
    border-radius: 0 !important;
    text-transform: capitalize !important;
    box-shadow: none !important;
}